Git tutorial
Basic usage of Git for development
Git syntax and usage tutorial:
(I've highlighted all the commands you need to enter like
Setup:
Download git from here and install it.
MAC: Open terminal (If you don't know where it is, hit command-enter, type in
WINDOWS: Open command line. (if you don't know where it is, hit Windows+R, type in
MAC: Enter
WINDOWS: Enter
Both:
You can switch folders using 'cd'. So if your documents folder is in your current folder, enter
When you are in the correct place where you want to keep your new code folder, enter
Enter
Enter
Git will ask you for your username and password.
When you enter your password, the characters won't appear- this is normal. It's a security thing so that nobody sees your password, and your password isn't stored in a log where somebody can find it.
When done, you will have all the files that are currently uploaded on github, and you can see all the code.
Before you start coding, you should make a new 'branch' which is an offshoot of the main 'master' branch, allowing you to make changes and merge back into the main branch later. This way, if multiple people are working on the code at the same time, you don't have to worry about accidentally changing something that breaks somebody else's code. In your new branch you can alter the files, change them, and experiment without altering the main branch that everyone else is working out of. To make a new branch:
Enter

Here's how the branches work:
the 'master' branch is the top-level branch where all of the features will eventually be added. The idea is that master should always work no matter what, and it should be tested to make sure there aren't any conflicts. Master is basically the most stable version of the entire repository that we have.
The branch marked with a * (also green in my terminal) is the branch that you are currently working in. Any changes you make will go to that branch, and no others.
The red-text branches that start with remotes/origin are the branches that are online on github.com. There's a remote/online version of all branches that have been updated. You can see in the picture that even though I am in the HotspotQuantification branch, there's also a remotes/origin/HotspotQuantification branch.
If you want to checkout somebody else's branch (for example the 'GUIproto1' branch) then the command is
Once you've checked out branches for the first time, they are stored locally on your computer. If you type in
Making changes:
If you make changes or a new file:
First, enter
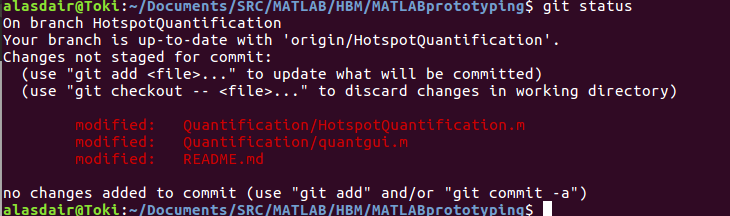
Once you make changes, you have to manually tell github which changes you want to upload. You can see above I have three files that are modified and are not 'staged for commit'. Everytime you upload your code and changes to the github repository, you upload using a 'commit'. You add your changes to the commit, and then finally push them to the internet. Before you actually commit, you 'stage' your changes by entering
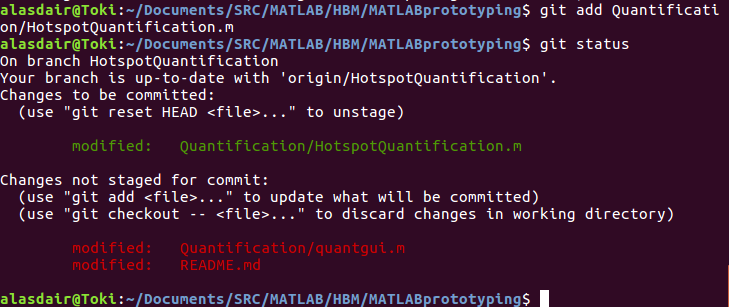
You can see above that once I added the file and rechecked the status, git updates that file to green, indicating that when you commit your changes, Quantification/HotspotQuantification.m will be updated too. If you add something that you don't actually want to update, enter
When you are finally ready to commit, the command is
Updating with changes others made
If somebody else writes some changes that you want to add, use
Git stash
Git stash is a useful command when you realize that you need to update or change your local branch but you have unsaved changes that you don't want to delete. For example:
- If you cloned the repository and immediately began coding but realized that you never checked out to a separate branch, and are now unable to push your changes
- If somebody else made changes that you want to use/integrate but your code isn't working/running yet and you don't want to commit the broken code
- If you are in the middle of working on someone but you want to check out somebody else's code (for example for a code review or for testing before a release)
In these cases, you want to use git stash. Git stash can be used for a large set of nuanced scenarios, but only the simple use will be described here. Look online for more information.
In order to 'stash' all of your local changes, the command is simply
Finally, when you are ready to put your changes back, enter
Of course, should you need to, you can always use git stash again and continue to git stash pop whenever you need to. However, it's important to note that if you need to stash multiple times without restoring the stash, those stashes become back logged. Git stash pop will always reapply the last changes that were stashed. So if you stash twice, you'll have to git stash pop twice in order to get to that first stash. In this scenario, you may be better off using a message. When you use git stash, you can optionally add a message just like when you are committing.
Cheat Sheet:
| Command | Action |
|---|---|
| git init | Sets up a folder on your computer to support git commands |
| git clone [url] | Clones a repository from github.com so that you have access on your computer |
| git branch | Lists all of the local branches. Does not show online branches. |
| git branch -a | Lists all local and online branches |
| git checkout [branchname] | Switches your current working branch to branch 'branchname'. |
| git branch -b [branchname] origin/[branchname] | Creates a new branch that is identical to the branch online called 'branchname' |
| git branch -b [branchname] | Creates a new local branch but does not pull anything from online. Only use this command if you are making a completely new branch- one that is not found online. |
| git pull | Checks github for updates to the repository and downloads them to your system. |
| git add [filename] | Stages the file 'filename' to your next commit, so when you commit that file is uploaded to the github.com repository. |
| git reset HEAD [filename] | Un-stages the file 'filename' from your next commit so that it won't be uploaded when you commit |
| git commit -m "commit message here" | Commits your changes with the message 'commit message here', which everyone will see online |
| git push | Pushes your commits to the internet so everyone has access to your code and changes |
| git status | Checks the status of your next commit and shows you all tracked and untracked files |
| git stash | 'Stashes' your local changes so you can freely checkout a new branch or pull changes down |
| git stash pop | Reapplies the most recent local changes that you temporarily removed using 'git stash' |